


|
Contact Us: Call or text cell# 626-378-0348 Email: jerrysm@sanmartintattoo.com |


|
There are a variety of contact screws available; however, not all contact screws function alike. Let’s take a look at what a contact screw does? The contact screw on a tattoo machine allows current to run on it and into the front spring, while absorbing the constant hit of the returning front spring. Keep in mind that electricity runs on the outside of metal, not inside. This opening and closing can take a toll on the contact screw material. This constant break in current flow causes carbon build up and fowling. Additionally, the quality and type of material used for the contact screw will determine its conductive ability (how easily electricity runs on the surface of the metal) Silver has the least restriction and thus requires the least amount of voltage. Additionally, less carbon build up and fowling are created when using this material and my super contact cleaner. * Note - not all contact cleaners are suited for Tattoo Machine application, San Martin Tattoo super contact cleaner has been tried and tested to out perform all other brands.
Contact screws that are machined with a ball or thicker head are great for absorbing vibrations; however, the contact screw must be one solid piece. One piece contact screws are the best, they help reduce vibrations. Things must not be added or glued on top of contact screws (skulls, pennies, dice) they allow room for vibrations, because of the cavities that exist. Reducing vibrations is one of the most important goals when building a Tattoo Machine.
The most common materials used for contact screws are: Silver, Copper and Electrical Brass. Notice the word electrical before brass, this is because there are many forms of brass and not all are good for use as contact screw material. Silver and copper are highly conductive but soft. Brass is stronger but not as conductive, unless it’s electrical brass, yet silver/ copper remain superior to electrical brass in conductivity not in strength. This is why so many machine builders use brass over silver or copper, its strength allows the screw to wear out slower preventing a loss in tune; however, requiring more voltage to run than silver or copper.
Conductivity is measured by the International Annealed Copper Standard. The conductivity of annealed Copper is defined to be 100% IACS at 20C. The conductivity of all metals is compared back to this standard. The Relative Conductivity of the metals used for Tattoo Machine screw are as follows: Copper = 100, Brass = 28, Silver = 106. A higher conductivity allows the machine to run at lower voltage, because there is less resistance in the current flow. As tattoo machine builders, we are constantly looking to optimize the performance of our machines. This includes reducing vibrations and lowering the functional power band voltage. A machine that runs at a lower voltage maintains its performance longer. When the machines coils heat up (run hot) there magnetism begins to dissipate, causing fluctuations. This also means the coils on the same machine using a brass contact screw create the same magnetism (strength of magnetic pull) with a lower voltage when using a silver contact screw.
Using a Silver contact screw allows you to run the same machine at 1 volt less in comparison to all other metals used. Silver has the highest conductivity rating, so this is my choice metal. There are more pros than cons when it comes to using this material (more detailed info on my book: The Secret to Life: Tattooing Information) for a contact screw. The main concern for not using it has been that it mushrooms or wears down to quickly; however, using a high quality sterling silver screw will rectify this issue. Along with using my Super Contact Cleaner (see tools), a silver contact screw and front spring will have a long life. It won’t have the same wear resistance as brass but it will withstand enough use to finish a medium sized tattoo without having to be readjusted. Additionally, if an adjustment is needed I have no qualms in doing so. Before installing your new contact screw, take a look at your current set-up, does your current contact screw hit perfectly flat, because the machine frame allows the angle of the screw to hit squarely on the tip of the front spring? Or does your contact screw have a relaxed angle and only a portion of the contact screw end hit the front spring? Is the tip of the front spring extremely narrow? The best designed machines have the contact screw angle hitting squarely flat on the tip of the front spring and the screw end matches the space of the spring tip!
However, some machine frames won’t allow the proper angle for the contact screw to hit perfectly flat and there’s only little room for bending the spring tip without affecting machine performance. So rounding the tips of the contact screws for machine frames that have fixed contact screw locations at a relaxed angle, makes perfect sense. NEVER FILE THE CONTACT SCREW AT AN ANGLE TO COMPENSATE FOR THESE MACHINES! (more information on why not to file screws at an angle, can be found in my book, “The Secret to Life: Tattooing Information.”) Contact screws that are not rounded for these relaxed angled machines run the risk of prematurely wearing down the spring. The threads in the contact screw tear at the spring tip. Also, a round tip provides a smoother running machine for these machine frames. There are more benefits to having a contact screw hit flat on the front spring rather than having to round off the screw on machines with relaxed angled frames.
However, if your current machine was designed this way, you are better off rounding it than having a flat ended contact screw constantly striking the front spring at its corner, causing premature failure. If your front spring tip is extremely narrow you can use the pointed contact screw tip “as is” or adjust it to match the width of the front spring tip. There are some really nice diamond files used for filing the grooves on tube tips; however, they can be used to file your contact screws flat as well or use my special concave file for rounding your contact screws (TOOLS section, page I & II). There are too many details and formulas when it comes to building a functional optimized machine. More pertinent information on advanced machine tuning and tattooing can be found in my book, “The Secret to Life: Tattooing Information.” San Martin Tattoo © 2011
|
|
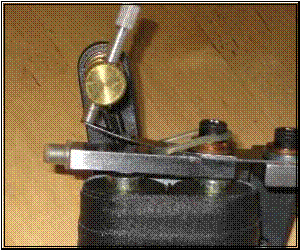
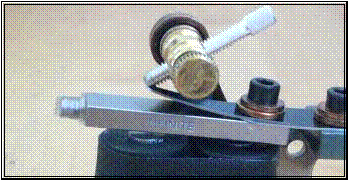
Contact Screws |
|
Squared frame - contact screw hits flat and square, notice the full face of the contact screw takes up the spring tip end. The very edge of the contact screw matches the edge of the spring tip perfectly, it doesn’t go past the front of the spring tip or behind it. |
|
Relaxed angle frame - notice the rounded end of the contact screw. This frame is cut-back too far and if the contact screw were placed in the 1 o’clock position, it would require a severely short front spring to have the contact screw hit flat. This would increase the speed beyond its functional tattooing limit, so rounding the end of the contact screw enables this machine to run at its best. |