

|
Contact Us: Call or text cell# 626-378-0348 Email: jerrysm@sanmartintattoo.com |



|
Thank you for your purchase of the San Martin Feeler gauge for Tattoo Machines. These sizes are specific for the tattoo industry. Includes 7 blades: .040, .045, .050, .055, .060, .070 and .080”
CONTACT POINT GAP
Typically, San Martin Tattoo uses the following Gauges for measuring point gap:
.040, .045, .050, .055, .060 = shading machines
.050, .055, .060 = lining machines
.060, .070, .080, .105 = color machines.
Knowing the right gap for each job is crucial. Your Tattooing needs will determine the right gap to use (Shading, Coloring, Lining, Needles & Inks used, etc.) Thin inks will usually require less contact gap and a shorter throw gap, thicker pigments will require more contact gap and a longer throw; however, the amount of needles being used supersedes ink/ pigment viscosity. More needles used require more gap to allow more room for force and more ink grabbed inside the tube tip. Knowing the right contact point gap, throw gap and needle gap for your machine is crucial when optimizing.
The main purpose of the contact gap is to adjust the speed of the Throw but it can consequently increase or decrease the Throw! Basically, how fast the contact opens and closes (how fast the throw will be). The contact gap is not primarily used to adjust the speed of the machine but it can alter the speed of the machine slightly. The speed of the machine (overall machine speed measured in Hz) is adjusted mainly via the front spring width and length! A smaller contact gap will open and close the throw faster, thus creating closer pokes into the skin, which results in nice even shades. A wider contact gap could achieve this but would require a lot more rear spring tension. Typically, a wider gap is great for coloring, because the Throw is larger and the needles can grab more pigment from the tube tip, It also slows the speed of the Throw to allow the pigment viscosity to flow in sync with the needle speed. If the Throw speed is too fast and the Throw is short: color pigments won't get into the skin, because the needles are spearing right through the pigment as the machine is running, resulting in the pigment remaining on top of the needles as they go up and down. There is a sweet spot that you must find for each machine. The Needle Extension when coloring is longer than in shading and the needles must retract back fully into the tube to grab enough ink for color saturation. Therefore, color machines use a long throw, so the needles can grab more ink from the tube tip, thereby, saturating the skin with ink every time the needles pierce.
THROW GAP
Throw gap is one of the most important measurements in tuning a machine. It usually falls between .050 thru .080.
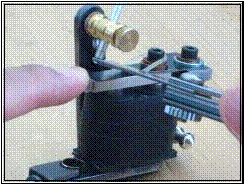
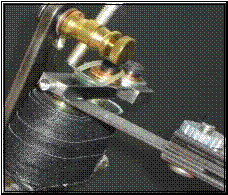
You measure Throw Gap (machine stroke) underneath the front coil top, right in the center of the top. With the machine in closed contact position, slide the feeler gauge in between the bottom of the Armature bar and the top of the front coil core. Slide it until the blade stops half-way into the coil core. Obviously, you will need to try different blades until you find the one that slides in perfect and stops at the center of the core. This is where you take the measurement for throw gap. Amongst other critical measurements, this gap informs you on whether your machine will have enough space between the Armature Bar and Coil Core to create the force required to puncture a set number of needles and how much distance the needles will ride up and down on the tube. Getting a good measurement reading on a Throw Gap will give you a good estimate of what the Needle Throw will be. Throw Gap and Needle Throw are the same measurement but taken in different locations.
A visual check can give you a good estimate of both the “Throw gap” and “Needle throw” by simply watching the needle bar nipple move up and down: two overlapping circles would be a short stroke, a figure eight would be a medium stroke and two circles not touching each other would be a long stroke. You can get the best view of this nipple motion with the Tattoo Machine unloaded and without a grommet.
NEEDLE THROW
Needle Throw is not the same as Needle Extension, which is used when setting up your machines for Tattooing. The needles are extended (protruding) out of the tube at different distances for Coloring, Shading and Lining.
Our coil machines don’t have linear motion Armature Bars (A-Bars), you will notice the A-Bar angled upward, so the closer you get to the Armature Bar nipple the longer the throw measurement will be. So, the throw checked at the A-Bar nipple will be larger than the “Throw gap” checked at the front coil core.
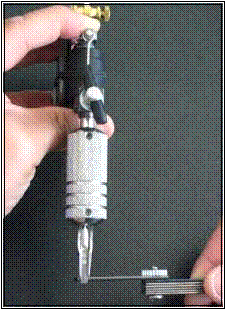
The “Needle throw” gap measurement comes directly from the A-Bar nipple, with your machine loaded, you start by placing the needles or a blank needle bar (needle bar without needles) at the edge of the tube tip and press down on the armature bar, next you measure the needles or bar hanging out from the edge of the tube, to the tip of the needles or bar. Use a feeler gauge to get an exact measurement. This measurement gives you the machines “Needle throw” and is the same throw measured on most rotary machines. A rotary machines throw typically is: 2.5mm lining, 3.5mm shading, 4-5mm coloring
On coil machines the needle throw will usually fall between .080”-.120” putting it in the 2mm-2.5mm range. Rotary’s have several advantages for coloring over coil machines. The advantage of a rotary is that it has a longer stroke, allowing the needles to grab more ink from the tube tip. Additionally, rotary’s are more consistent, long term, than coil machines. Coil machines use a hammer-like action to puncture the needles and rotary’s press up and down. Rotary’s have a stable steady speed with minimal vibrations. Also the downward stroke is set to where the needles stay in the skin longer than the upward stroke that pulls the needles out of the skin. However, both have there place in the tattoo industry and you can read about the advantages and disadvantages of both types of machines and how to maximize there use on my book, “The Secret to Life: Tattooing Information.”
San Martin Tattoo © 2011 |
|
Feeler Gauge |
