

|
Contact Us: Call or text cell# 626-378-0348 Email: jerrysm@sanmartintattoo.com |


|
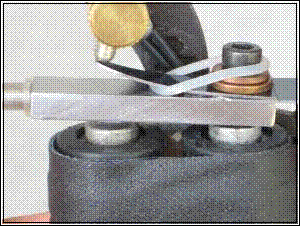
All Tattoo Machines will benefit from using an O-Ring or other dampening sheet under the front spring. Some machines come with a small O-Ring embedded into the Armature Bar directly under the front spring. Depending on machine specifications some can perform without one but every effort should be made to incorporate a functioning O-Ring or a dampening sheet on a Tattoo Machine, the reason being: O-Rings reduce vibrations and noise! You can build a machine without an O-Ring that runs smooth; however, adding the “right” kind of O-Ring or dampening sheet will make that same machine run even smoother with less vibrations and noise - vibrations being the most important!
O-Rings come in many sizes and materials. In order to choose the right size and material, we need to look at what the O-Ring does when used on a Tattoo Machine. An O-Ring is placed under the front spring and pulled back either behind the Armature Bar cap screw or behind the armature bar under the rear spring. Even though placing the O-Ring behind the Armature Bar under the rear spring has its benefits, like keeping a higher duty cycle when needed, the downside out weighs the benefits. The downside to having an O-Ring placed like this is having to loosen the Armature Bar to allow the O-Ring to fit underneath it and then readjusting the Armature Bar in perfect alignment. If the O-Ring were to fail or needed replacement the hassle of having to perform this procedure wouldn’t be worth it, in my opinion. In addition, with the right amount of Tattoo Machine technical knowledge, you can achieve the same benefit of this set-up with the O-Ring placed over the cap screw, if needed. Obviously, I prefer the O-Ring placed over the Armature Bar cap screw. This placement allows for easy replacement and adjustments.
The O-Ring functions best on a machine when it fits tightly under the spring, pulled back over the cap screw. Once an O-Ring is installed it slightly moves the pivot point of the front spring forward, in essence shortening the front spring (hardening the front spring), this causes an increase in machine speed. The tightness of the O-Ring on the spring causes a slight decrease in duty cycle, “the tighter it is” the more drop in duty cycle (remember, after installing your new O-Ring you need to readjust your contact gap to its designated size and this is where you’ll notice the slight drop in duty cycle). Additionally, the width and the hardness of the O-Ring can cause an increase in the angle of the front spring! A high angled front spring causes a shorter stroke, faster machine speed and harder hit, while decreasing your power band (limits the smoothness of the machine on low or high volts). When adding an O-Ring to any machine the duty will begin to drop, starting at 3% but will vary with the tightness of the O-Ring and the machine will require an additional 2 volts to run optimally. The speed of the machine will increase but the increase will vary depending on the thickness & tightness of the O-Ring and current machine speed. Overall machine speed is adjusted via the front springs and measured in hertz.
The preferred hardness of the O-Ring should allow for some compression, this allows the O-Ring to absorb the constant impact of the front spring. The correct hardness is 70 duro. If the O-Ring is too hard (e.g., 90 duro) it won’t absorb the vibrations as good. Remember, when building machines we are looking for optimal performance. A Tattoo Machines optimal front spring angle is low. Keeping the front spring at a low angle, allows for a wider power band ( meaning you can use the same machine on low & high voltage, without compromising smoothness) and a softer smoother hit. In fact, depending on the O-Ring thickness the front spring angle will raise; therefore, we need an O-Ring that limits the increased angle of the front spring. We are looking for an O-Ring that will help the front spring angle stay low. On most machines the perfect O-Ring thickness is 1/16”
Machines that have frames designed without the use of an O-Ring are specific to an application (i.e., shading, coloring, lining) and have a specific speed that benefits that type of tattooing. The thickness of an added O-Ring, on these machines, can increase the speed of the machine, which will alter the intended speed and performance for the application. However, these machines can still benefit from an O-Ring, if the width is decreased to where it fits perfectly under the front spring without increasing the angle or extending to far forward (hardening the front spring). In these cases a 1/32” thick O-Ring can improve the machines smoothness and reduce vibrations without increasing machine speed. This type of O-Ring is hard to obtain and could require a special order or fabrication. However, there is a quick and simple fix without breaking the bank to produce custom O-Rings. You can use a strip of my synthetic material sheeting (see Machine Parts III) and slide it underneath the front spring to its upmost rear, nice and tight. Next, you take a razor and cut-off the excess sheeting to the sides of the front spring. The synthetic sheeting thickness is about 1/32 or equal to the front spring/ armature bar gap. You will notice a smoother running machine without compromising the machines original speed set-up. Machines can be designed with the use of an O-Ring, Sheeting or other dampening system under the front spring. With a machine designed for O-Ring use, you can add the synthetic sheeting under the front spring as added insurance, along with the O-Ring.
Also, the tighter the O-Ring is under the front spring will cause a drop in duty cycle. This can benefit the machine in many ways if it’s running smooth with this set-up. A lower duty cycle allows the needles to remain in the skin longer resulting in better ink/ pigment saturation. However, there is a limit on how low the duty cycle can be before causing undue trauma. After testing various duty cycles, I’ve determined not to go below 40% on liners and 43% on shader/ color machines. If you can achieve a smooth running machine at your intended speed with 0% STL or FT, and a low duty cycle, within spec’s, you’ve created the perfect coil machine. All my machines are tuned by both Ear & Numbers.
O-Rings are made of various materials: BUNA, Neoprene, Silicone, Rubber, etc. The most commonly used are rubber and BUNA. O-Rings weren’t designed to go under a tattoo spring and act as a vibration dampener. O-Rings were designed to seal fittings. These fittings seal liquids, air, and gasses. Therefore, when choosing an O-Ring for a tattoo machine, we must ask ourselves, “What is the purpose of Tattoo Machine O-Ring and what can cause its breakdown?” Our O-Rings act as vibration dampeners, they usually aren’t exposed to harsh chemicals, liquids or gasses. Occasionally, some pigment/ ink may get on the Ring and machines are wiped down with alcohol. They have to endure the constant compression of the front spring as it bounces upwards to its close position. The fact that its main purpose is to fight vibrations, we look for a durable O-Ring that can withstand the abuse and handle light chemical exposure. The most common Rubber and Buna are good and inexpensive Rings; however, they are not the best. As machine builders, we are constantly looking for optimal long-term performance. This brings us to the San Martin Tattoo synthetic material O-Ring. This ring may cost a bit more but it is designed for excellent wear and tear resistance. In fact, this material has the same properties as rubber and plastic combined, giving you the most durable O-Ring on the planet. Effectively reducing vibrations. Synthetic material O-Rings will last ten times longer than traditional rubber and BUNA O-Rings. Another great option in lieu of an O-Ring is using San Martin Tattoo synthetic sheeting. You can cut out a piece of this sheet, place it under the front spring and use it under the armature bar to reduce vibrations and noise. There are many materials and hardness for these sheets. I prefer 60 duro for the sheeting. The harder the material, the more bounce it will have, the softer material will absorb the impact without propelling the front spring upward, causing and increase in duty cycle. You get the best performance from an O-Ring by installing the Ring in a “one shot” motion and not removing it from its “Original” position. If your machine has a current O-Ring, remove it and inspect the size, don’t install and uninstall your O-Rings. You should install it once and leave it alone. Once you determine the correct size, install your new O-Ring on the first try and don’t remove it afterwards or change its position. The reasoning being that once installed the O-Ring forms an indentation where the spring meets the O-Ring. If the position of this indentation is changed, it can have an overall effect on the tension and bounce of the O-Ring. You will get the smoothest results with a one shot installation. If you absolutely must remove the O-Ring and reinstall, you can use a marker to identify the indentation points, by marking the sides where the spring meets the O-Ring, then you can reinstall it in the same position. However, I need to re-emphasize not installing and uninstalling O-Rings! Keeping a coil machines vibrations to a minimum is the goal of every machine builder, along with a consistent running machine. Another trick to keeping vibrations low is not to have a space between the coils. If a space exists, you can add a piece of San Martin Tattoo synthetic sheeting between the two coils (see Machine Parts III), this acts as a vibration dampener. In addition, you can wrap the assembled coils together with strong cloth tape, make sure to really tighten the two coils together with the tape. Reducing vibrations on coil machines is our goal. When the Armature bar strikes the front coil core, it sends vibrations down the needle bar through the needles and into the skin and this causes undue pain and trauma. Your clients will feel less pain and heal quicker with a machine that has minimal vibrations. Note: Rotary machines produce less vibrations, because there system is not based on a striking Armature bar, thus less pain is felt by clients when tattooed with rotary’s. The advantage of a coil machine over a rotary is the magnetic force! You can adjust the force on coil machines by simply reducing or increasing voltage. You cannot adjust the force on rotary’s, only the speed. Increasing or decreasing voltage on a rotary machine will only effect the speed, not the force! Rotary’s will strike with the same force whether your tattooing with a 3 round or 15 mag; however, because of the machines less vibrations and linear motion (linear models), customers don’t experience the same level of pain. Both types of machines have there place in the tattoo industry. More pertinent information on advanced machine tuning and tattooing can be found in my book, “The Secret to Life: Tattooing Information.” San Martin Tattoo © 2011 |
|
O-Rings |

|
This machine uses a round sticker under the Armature Bar to muffle the sound and reduce vibrations. It has a piece of sheeting in between the coils (look closely in the middle of both coils, you will notice the amber piece of sheeting). In addition, it uses a piece of sheeting (black 1/32 sheeting) under the front spring on top of using an O-Ring. Finally, both coils are tightly wrapped in cloth tape. There are many other factors and tips involved in optimizing this machine, which can be found in the San Martin Tattoo book, Secret to Life: Tattooing Information.
This machine runs sweet, with minimal vibrations and less trauma to the client. Tattoos heal very quickly. |

